Resources Hub
- Home
- Resources Hub
- Poll Everywhere
- Creating Your First Poll on Poll Everywhere
Creating Your First Poll on Poll Everywhere
This helpsheet will take you through how to create your first poll in Poll Everywhere. In this example we will create a common type of poll (multiple choice) but you can make any kind of poll you wish.
Creating a poll with Poll Everywhere
- Login to your Poll Everywhere account at polleverywhere.com. You will have set up your account already, if not please see helpsheet PE_010 for guidance on how to set up your account.
- From the Poll Everywhere homepage select ‘Create’ to make a new poll. The ‘Create’ button is located to the top left of the screen.

- Along the top of the next page, you will see the most popular question types from Poll Everywhere users. It is worth noting that Poll Everywhere update their question types on a regular basis so these question types may change without notice.

- If you are unsure about the different types of polls, please see helpsheet PE_0004 which explains the different poll types and they work.
- In this example we are creating a multiple-choice question, so we select that option from the menu and enter the details of our question.
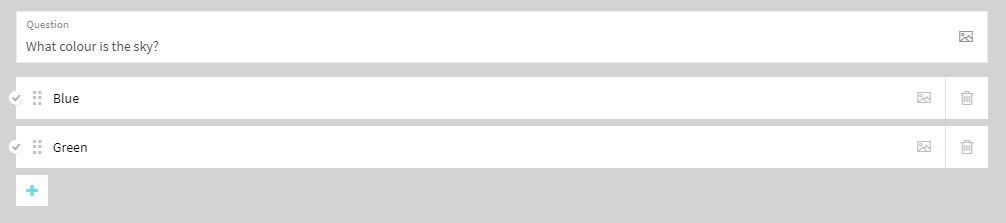
- In some question types, such as multiple choice, you will have the option to add more answers to your question by clicking the plus icon. You will also need to click the tick icon next to the answer you wish to mark as correct if you are asking a question that has a correct answer.
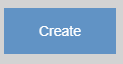
- When you have prepared your poll and are happy with it, click the create button to move on.
- On the next page you will see the live deployment screen from where you can make your poll available or students to use. In this helpsheet we are focusing on creating a question, helpsheet PE_003 has more information on how to use polls with your students.
- On the right-hand side of the screen you will see a menu with three additional settings, ‘Configure’, ‘Test’ and ‘Present’.

- In the configure settings you can:
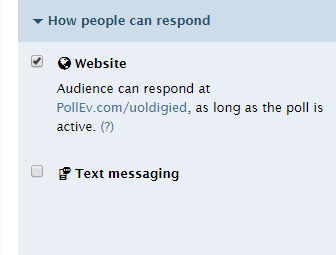
Choose how people respond, either on the web or via text message. We would advise turning off the text message (SMS) functionality unless you feel you will have students who cannot access on the web. If you do use the text message function, users experience will be limited, and they will be charged at their standard message rate.
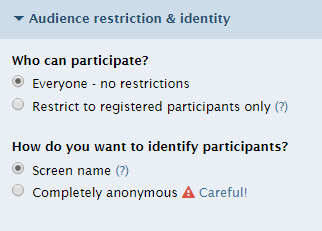
Decide if you want users to enter a screenname or restrict your poll to registers users only. If you wish to restrict your poll to registers users only, you should contact digitaleducation@lincoln.ac.uk in the first instance so we can set your students up with an account.
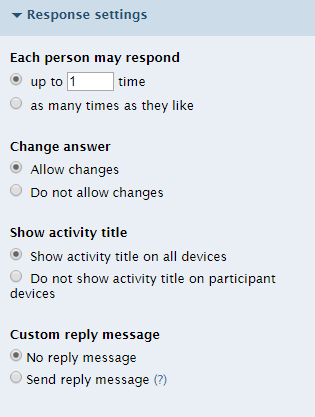
Set your response settings. Decide how many times you wish your students to respond and if they can change their answer or not after responding to your poll. You can also choose to send a reply to students once they have completed the poll. This is particularly useful if you chose a correct answer in step 6 as you can personalise the response that students will get.
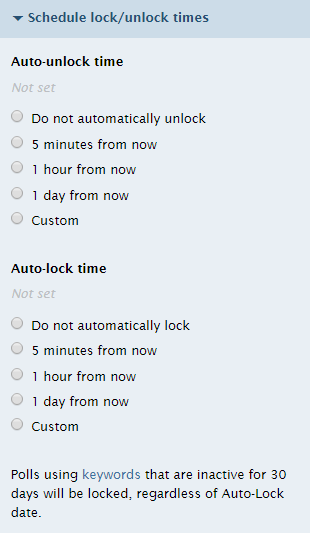
Schedule lock/unlock times. You can decide when your poll will be made available and when it will close. Do not worry too much about this step, as when you deploy the poll you can manually make it available and unavailable again as described in helpsheet PE_003.
- In the Test settings you can:
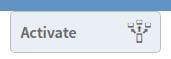
Test your poll to see how students will respond. In order to test your poll you will need to make it active first, do so by clicking the active button. Be sure to click this again when you are finished to deactivate the poll.
- In the Present settings you can:
See further information on how you can present. There are several ways to present your poll and they are detailed here. The best way is to make the poll active and then provide your students with your personal URL. It will begin with pollev.com/[your-username].
- Once you are happy with the poll you have created, click Polls on the left side of the top navigation bar and you will return to your main profile page.
