Resources Hub
- Home
- Resources Hub
- Managers and Administrators
- Bulk Importing Learner Accounts
Bulk Importing Learner Accounts
In addition to creating individual user accounts, it is possible for Centre and User Mangers to create a batch import file, using a CSV (comma-separated value) file, in order to create multiple learner accounts based on similar paramtres – such as cohort and framework template. The CSV file should contain the first and last name of the learners, as well as the default email address, with optional fields available for date of birth, MIS value, SFA ethnicity code and date registered with the centre.
Once the file has been imported, you will be able to assign the:
- Default Tutor
- Cohort
- Placement
- Framework Template
- Eportfolio Start Date
This can be done in bulk by selecting the options from the drop-down lists at the top of the page (as shown in this guide), or alternatively, you can edit each learner individually by selecting a different option on the row of the learner.
Please note: it is important to ensure that the tutor accounts, cohorts, placements and framework templates have already been created prior to the bulk import process, in order to allow you to take full advantage of this feature.
Creating the CSV File
When creating your CSV file, you should ensure that it contains the following column headings, and that the correct cell format in Microsoft Excel has been selected, for most values the ‘general’ format is suitable, except for the date of birth value and the date registered, where you should select ‘Short Date’ or ‘Date’.
- First Name (required)
- Last Name (required)
- Email Address (required)
- MIS Value (optional)
- Ethnicity Code (optional)
- Date of Birth
- Date Registered
If you would prefer to download a template, you can do so by accessing the following link, which will provide you with a CSV document from One File, additionally, an example of a populated CSV file is shown below. Ensure that you save the file as a ‘CSV (Comma Delimited) (*.CSV)’.

Importing into One File
Once you have created your bulk import file, login to One File using either a Centre or User Manager account, and navigate to the Learners tab of the Users section, you will now be able to locate the ‘Bulk Import Learners’ button.
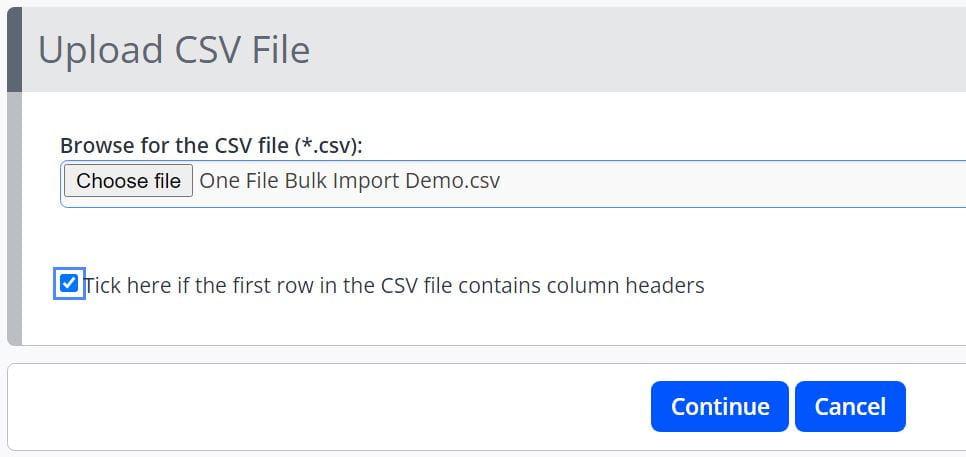
- Firstly, click the button labelled ‘Bulk Import Learners’ to begin the process.

- Secondly, click the ‘Choose File’ button to open your computer’s file browser, and locate the CSV file you wish to upload.
- If your CSV document contains column headers, tick the checkbox displayed, otherwise these headings will be imported as a learner account.
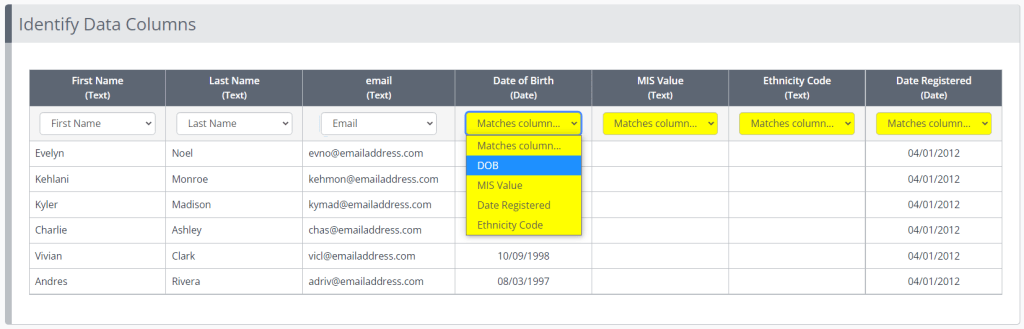
- Once the file has been imported, it is essential that you complete the column matching task. Each column heading will contain a yellow dropdown box, you should use this to select the correct column heading, as displayed below:
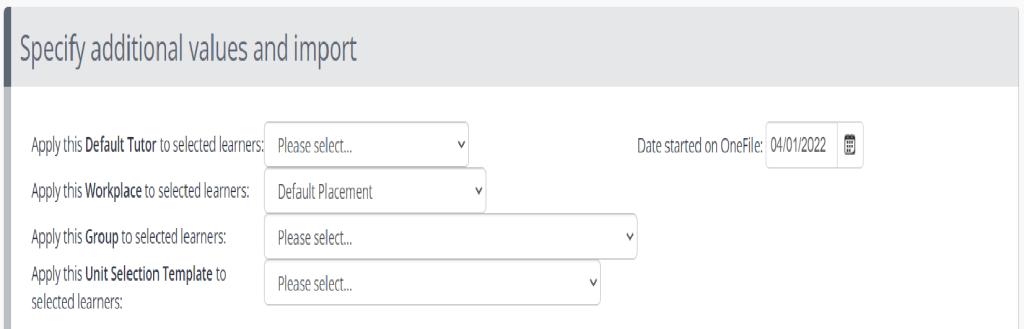
- Above the table you will see tools for bulk assigning additional values, these are the default tutor, the workplace or placement, the group or cohort, and the Framework Template (in some centres this is called the Unit Selection Template).
- Selecting an option from these dropdown menus will add the value to all learners in the import, this helps to quickly assign common values, and can be used where most learners have the same information, with individual cases being amended afterwards.
- Once you have assigned all additional values, you table should look similar to the one below, you will notice that every cell for each learner has been populated.

- When all the data has been entered, simply click ‘Import Selected Learners’ and allow the system to process your request.

What is Not Included in the Import?
Whilst the bulk import option allows us to save time and quickly create a large number of learner accounts based on common criteria, there are still values that need to be manually populated, often on a learner-by-learner basis, the following list is not exhaustive, but you should ensure that you assign:
- Off the job Hours (Total Contracted Hours).
- Employer and Observer Accounts.
- Additional Tutors and Assessors.
- Custom Forms (unless automatic rules exist).
Support with Centre Setup and Management
If you require support with the setup or management of your One File Centre, please contact the Digital Education Team by emailing digitaleducation@lincoln.ac.uk. For queries relating to non-technical support and about the operation of your apprenticeship programme, you should contact the University of Lincoln’s Office of Quality, Standards and Partnerships.